| |
When you are preparing for a do-it-yourself kitchen cabinet installation, keep in mind that installing them properly is the main ingredient that will make a kitchen remodel successful.
Using proper guidelines will be necessary, so that your cabinets will work correctly for years to come.
Once you have finished the new kitchen walls, kitchen cabinet installation is the next step.
You will need basic skills in carpentry, but the job is not as difficult as it may seem. The most challenging part is handling minor issues like floors, corners and walls that are not quite level or square. Lay out your plan ahead of time, to make the job easier.
 Mark the walls for the layout of your cabinets, before you begin a DIY kitchen cabinet installation. Put plumb and level lines so that you know everything will line up correctly. Stock cabinets won't always fit perfectly, but there should be narrow spaces provided that will fill in those gaps. Be careful not to make "dings" in your new doors when you are installing them. Masking tape numbers on the cabinets will help you keep track of which piece comes next, as you work.
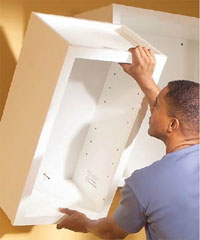
When you look over your DIY kitchen cabinet installation job, remember that you will have to securely fasten the cabinets to the framing on the wall. Place them along the stud so that they will have solid support. The wall cabinets are usually installed first, so that the base cabinets are not in your way when installing the wall units.
Installing your corner units first is a good first step in your do-it-yourself kitchen cabinet installation guidelines. Then you can square them up and move to the wall center, where there is more room to make adjustments. This applies to your base cabinets, as well, when you are working with your kitchen cabinet installation.
Secure the first corner cabinet through the nailing strips found on the cabinet back. Set the next cabinet in place, snugly against your wall, and also snugly against the first cabinet side. Line the face frames up and clamp them tightly together. This is an important first step in your kitchen cabinet installation. Pre-drill through the first frame to the second and use screws to secure them. Follow this procedure until all of your new cabinets are firmly in place.
When you're ready for the base cabinets, set the first one in the corner, and line it up.
|
|
You can use shims under its back to raise it level with your reference line.
Screw into the top nailing strip and on into the studs of your wall. Recheck it, to make sure that it's level.
Set the next cabinet in, and then snug it to the first cabinet and the wall, and follow the same steps to screw it into the studs in the wall. Lining up the back and securely clamping the cabinets together is an essential step in do-it-yourself kitchen cabinet installation. Continue this way until all of your new kitchen cabinet base units are in. Once your lines of cabinets are in, use filler pieces to deal with gaps you may find, setting them and filing or planing, as needed. Then step back and admire your work. You have a beautiful new kitchen.

